Binary Searching bugs with Git Bisect
Table of Contents
Introduction
The time is 7PM. Your software project is due at 11:59PM. You have yet to write the developer guide to document your software which is part of the submission. You are writing a testing plan which also serves as a guide for your graders to assess your software. As you were writing the steps to test, you discovered a regression. This feature that was working just 3 hours ago is now causing the application to crash! What happened? What would you do?
I was in this exact situation recently for a school project. I had to decide whether it was worth identifying this bug and writing a patch for it (and potentially breaking other features for whatever reason it might be), or whether I should continue with the rest of the submission documents. I panicked really hard. In that moment of desperation, from a deep region in my memory, I suddenly recalled: git bisect.
I had known the principle of git bisect – it essentially performs a binary search for the first commit which caused a particular bug. It was going to be the first time I was using it. I quickly looked up tutorials and documentation online. 10 minutes later, I found the commit which caused the bug. Quickly patched it up (whether there were further bugs is another story altogether), and went back to writing my other submission documents.
In that one usage, git bisect easily became my favourite git command. In this post, I hope to provide a simple use case and guide to use git bisect, while demonstrating how fast it can help you identify the violating commit.
A basic understanding of data structures and algorithms (array/linked lists and linear/binary search) and git (e.g. committing, checking-out commits) is preferred, but I think the concepts are intuitive enough and I will try to make it as accessible as I can.
Theory
Let us recall the concept of linear and binary search in the context of an array.
Linear Search
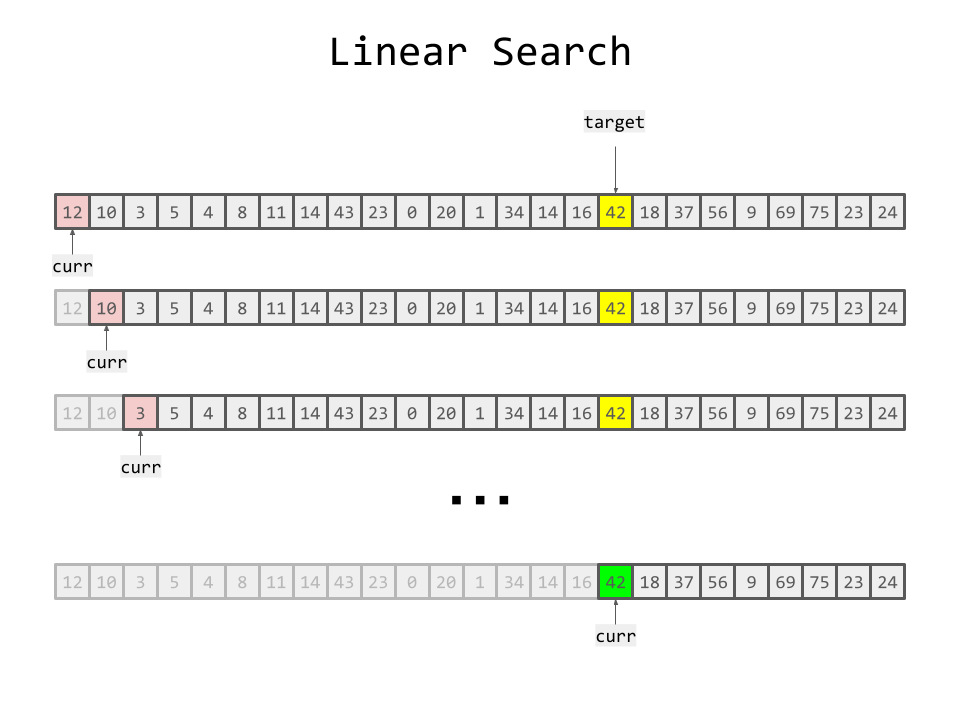
The strategy is pretty simple - you will look up the element that you want in the array one-by-one:

Binary Search
Algorithm classes in school would usually teach the concept of binary search in the context of a sorted array. The idea is as follows:
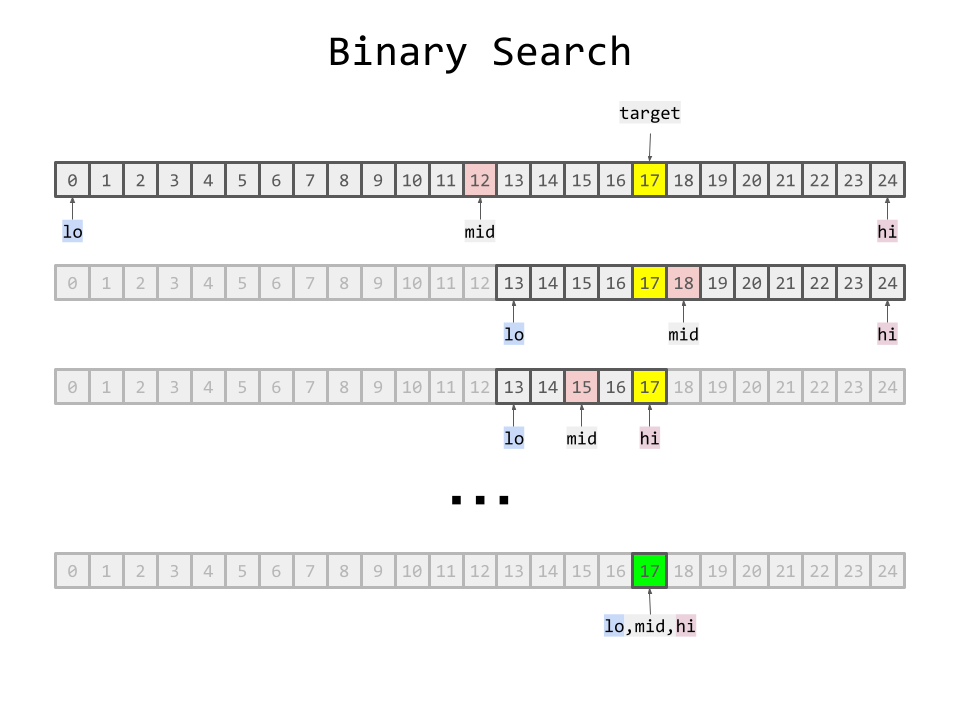
- Look at the “middle” element and make a comparison.
- If that “middle” element is exactly the one you are looking for, return
true(or its index). If what you are searching for is bigger than the middle element, discard ALL the values smaller than that element including itself1 and vice versa. - Repeat this process until you have found the desired element or have no elements left.
The following diagram shows a binary search in action:

The time complexity of a binary search is O(log(n)), where n is the number of elements in the array. This is way faster (exponentially faster, to be precise) than a linear search which takes time complexity O(n).
For reference, log2(1024) = 10 and log2(2048) = 11. This can be interpreted as it takes around 10 and 11 times of this “comparing with middle element” procedure described above if we are given an array of 1024 and 2048 respectively, before binary search terminates. In a linear search, we will need to do around 1024 and 2048 element-by-element inspections respectively.
I would like to note that binary search is a concept that is not just applicable to a sorted array. It is also applicable in the context of a monotonic function f(x) - where as x increases, f(x) will either stay the same or increase (correspondingly, decrease). Binary search is typically used to find the smallest (or largest) value satisfying some condition in a monotonic function.
It can also be used to find the “leftmost” value. In the case of binary searching on a sorted array, this can be thought of having duplicate elements and you are finding the “leftmost” value among duplicates of that value. This is precisely the concept of git bisect which I will introduce in a bit.
Using this concept in Git
In this post, let us concern ourselves with only regular commits, and not discuss merge commits. In this scenario, a commit history is essentially a linked list2 of commits as one can see here:

Thus, when presented with the scenario in the introduction, it might be natural for you to perform a linear search on the commit history. That is, you do a git checkout <commit hash> one-by-one down the history, until you encounter a commit where the bug does not occur. The previous commit is then the first occurrence of the bug. Of course, if you have your suspicions on which commit causes the bug, you can avoid doing a linear search entirely and just checkout there. But in this context, let’s suppose we have absolutely no idea what happened!
git bisect takes this concept in a binary search3 setting:
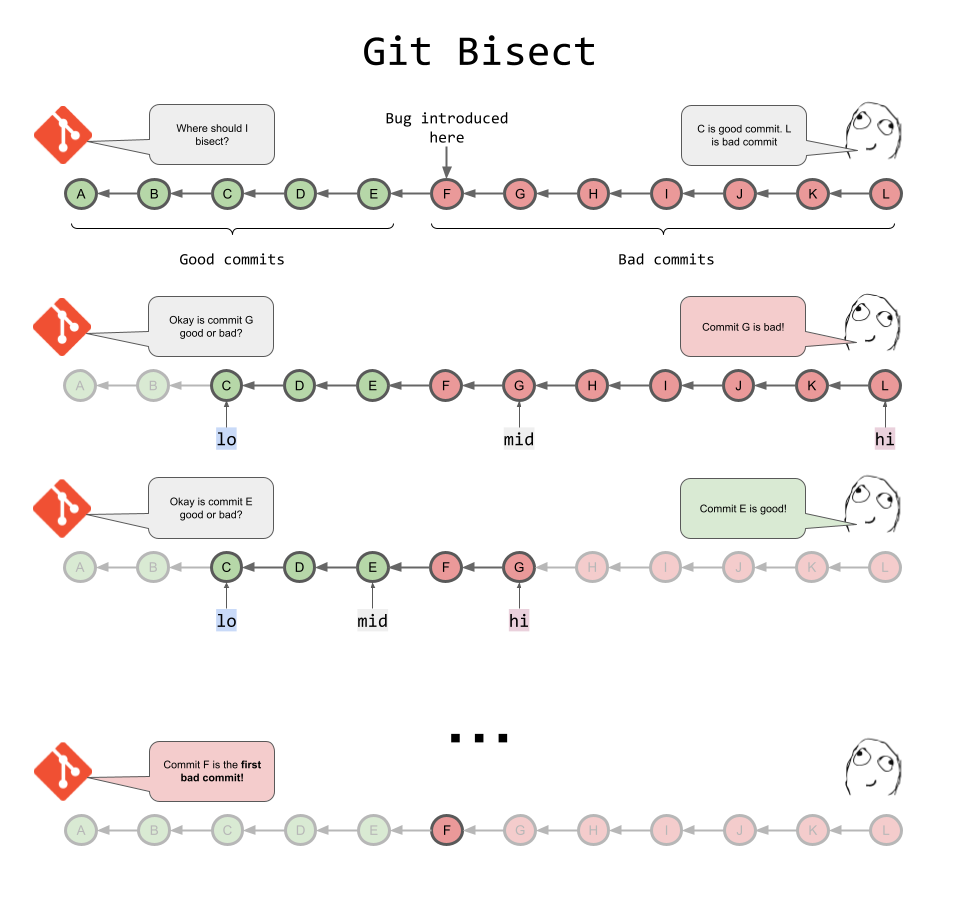
- It will ask you to give a range. Give it a commit where the bug has occurred, and another commit where the bug has not occurred.
- It will perform a binary search by performing a
checkouton the middle commit of the range, asking your feedback whether it was a good or bad commit. - It will then halve the range appropriately, until it pinpoints the exact commit where the bug first occurred.
Here is a rough visualisation, think of mid as the position that Git automatically checks-out to for you:

Going back to our theory, you can think of the good commits as having the value of “0”, and bad commits as having the value of “1”. Thus, it is like we are having an array of “0”s followed by “1”s, and we are searching for the “leftmost” 1 (which is the first bad commit).
Demo with Git Bisect
For now, enough theory. To illustrate the power of Git Bisect and how fast it can sift through the commit history, I have prepared this repository: https://github.com/chrisjwelly/git-bisect-demo for a demo. What I have is very simple:
- A commit history of around 1024 commits
- Two files:
good.txtandbad.txt
Let us pretend that bad.txt is a bug that was introduced in the middle of development. We want to find the commit that first introduced this bad.txt file using git bisect.
(Now, I am aware that there are easier ways than git bisect to identify this commit in this particular example, I prepared the example in this way in order to deliver the essence of this command: finding the commit where the bug was first introduced fast.)
Video Demo
For those who prefer looking at me trying to blaze through the commits, I recorded a video here:
Textual Instructions
For readers who prefer just reading, these are the steps to do it:
git bisect startwill initiate the Git Bisect wizard. It might not look like anything happened, but if you typegit status, it will show that you are currently bisectinggit bisect badto mark the current commit as badgit log --onelineand take the commit hash of the commit where the bug has not been introduced yet (finding a good commit)git bisect good <commit hash>to mark that commit as a good commit- Depending on whether the current one is good or bad, type
git bisect good, elsegit bisect bad - Repeat the procedure, deciding whether the commit is good or bad…
- Until you finally identified the first bad commit!
git bisect resetin order to exit the wizard
We see how with a repository of 1000 commits, we managed to identify the violating bug in just around 10 steps! Of course realistically, you probably will not have to examine a range of 1000 commits to spot a bug. When I used it for my project, I had to examine at most around 30 commits which amounts to around 5 steps. But it gives an indication of how powerful the command is; you don’t have to worry about having a lot of commits because git bisect can go through it in very little time.
Further Discussions
Alternatives in the demo
As mentioned earlier, in the example repository I gave, one can easily find the commit by simply checking when the file was introduced. Moreover, if you want to find out who made the change, one can also do a git blame.
However, git bisect is different. Consider a case like in the introduction section, when you discover regressions in the application. You have no idea which file or line of code caused it. You don’t even know what change caused it. All you know is that at some point in the past, this feature was working and now it isn’t. With git bisect, you can identify this first commit where the bug occurred, and also examine what changes were made in this commit.
Modular commits
This git bisect command works best if your commit is modular. That is, you don’t make tonnes of changes in a single commit. Each commit is relatively small and clear in what changes it introduces. I personally prefer committing regularly, and I was very grateful that I did, allowing me to run git bisect on my repository to identify the commit that caused the regression.
Prevention is better than cure
You might also want to adopt test-driven development or just write tests in general to prevent regressions. With a test suite set up, you will ensure that you don’t introduce bugs inadvertently. In my case however, the feature was rather difficult to test since it was a game (and frankly speaking, I had no time to write tests given the tight deadline of the project).
Automated Git Bisect
The process of entering git bisect good and git bisect bad for each checkout can be very tedious. To automate this, there exists a git bisect run <script> feature, which runs a script in order decide whether the current revision is a bad or good commit. I will not be discussing this method in this post (partially because I haven’t used it myself), but I may be in the future!
Assumptions about presence of the bug
An assumption we are implicitly making is that once the bug appears, it stays all the time (before you squash it, of course). That is, we don’t want a scenario when the commit has an irregular history of: good -> bad -> good -> bad.
In our discussion earlier, visualising the good and bad commits as “0”s and “1”s respectively, what we want is to have an array of “0”s followed by “1”s. We do not want to make it such that another “0” appear right after the consecutive “1”s, making the value not monotonically increasing anymore. In simpler terms, we don’t want to end up with an unsorted array, since we know that we are not able to run a binary search on an unsorted array.
Try an implementation for further understanding
A similar problem on Leetcode is available if you’d like to try an implementation yourself - https://leetcode.com/problems/first-bad-version/. Here, you can think of as the function given to you is the user inputting whether a commit is good or bad, and you are implementing the Git logic to halve the search range appropriately.
Summary
To summarise, here are the important steps that you need to do:
git bisect startto start the wizardgit bisect bad <commit hash>to first show where there is the buggit bisect good <commit hash>to tell the wizard where the commit without a bug is- Keep typing
git bisect goodorgit bisect baddepending on what the current commit is git bisect resetafter you have identified the bad commit
That story in the introduction wasn’t the only time I actually used git bisect. I have used this command at least 4 times throughout a single software engineering module.
For those of you who just discovered this command, I hope I managed to convince or at least give an idea of what git bisect can do. Perhaps you will find an opportunity to utilise it one day! (Although, I hope that you don’t have to do it because a bug was introduced)
For further reading, please refer to the Git Bisect documentation: https://git-scm.com/docs/git-bisect
1 There are different implementations. Some implementations discard values strictly smaller than the middle element. But it is more important to get the general idea here
2 It is more accurate to think of commit history as a directed graph, especially when we consider merge commits.
3 The astute reader might be thinking at this point: "But you can't binary search on a linked list! How can this be allowed!". I must admit that you have a point. This is something that I am trying to research as well with not much luck. For now, I would believe that Git has provided the necessary infrastructure in their implementation to make a binary search possible. Should I find anything, I would update this blog!
